
Directions
Step 1: Prepare the Crust
-
- In a medium bowl, mix together crushed graham crackers and melted butter until fully combined.
- Press the mixture firmly into the bottom of a lined 8×8-inch baking dish.
- Chill in the refrigerator for 10 minutes while you prepare the filling.
Step 2: Make the Filling
-
- In a large mixing bowl, beat the softened cream cheese, powdered sugar, and vanilla extract until smooth and creamy.
- In a separate bowl, whip the heavy cream until stiff peaks form.
- Gently fold the whipped cream into the cream cheese mixture until fully incorporated.
Step 3: Assemble the Slice
- Fold in mini marshmallows and white chocolate chips (if using).
- Spread the marshmallow mixture evenly over the chilled crust, smoothing out the top with a spatula.
- Sprinkle extra mini marshmallows on top for decoration.
Step 4: Chill & Serve
-
- Cover and refrigerate for at least 4 hours (or overnight) until firm.
- Slice into 12 squares and serve chilled. Enjoy!
Serving and Storage Tips
How to Serve:
-
- Serve chilled for the best texture.
- Add a drizzle of chocolate or caramel sauce for extra decadence.
- Pair with a cup of hot cocoa or coffee for a cozy treat.
How to Store:
- Refrigerator: Store in an airtight container for up to 5 days.
- Freezer: Freeze slices for up to 2 months. Thaw in the fridge before serving.
Helpful Notes
-
- Toast the Marshmallows for a Gooey Twist – Use a kitchen torch or broil the top for 30 seconds for a slightly toasted marshmallow flavor!
- Make It Gluten-Free – Use gluten-free graham crackers or digestive biscuits.
- Try a Different Crust – Swap graham crackers for Oreo crumbs or shortbread cookies for a new flavor.
- Add Nuts or Coconut – Mix in toasted coconut, chopped nuts, or sprinkles for more texture.
- Use Different Flavored Marshmallows – Try chocolate or strawberry marshmallows for a fun twist!
FAQs
1. Can I make this ahead of time?
Yes! This tastes even better the next day, so making it a day in advance is a great idea.
2. Can I use Cool Whip instead of whipped cream?
Yes! Substitute 2 cups of Cool Whip for the whipped cream for an even quicker version.
3. How do I make slicing easier?
Use a sharp knife dipped in warm water to get clean slices without sticking.
4. Can I use dark or milk chocolate instead of white chocolate?
Absolutely! Chocolate chips of any kind work great in this recipe.
5. Can I make this in a different pan size?
Yes! You can double the recipe and use a 9×13-inch pan for more servings.
Final Thoughts
This No-Bake Marshmallow Slice is light, creamy, and packed with fun flavors. The combination of fluffy marshmallows, smooth cream cheese, and buttery graham cracker crust makes every bite delightfully sweet and satisfying.
Best of all, it’s super easy to make, requires no baking, and is perfect for any occasion—from holiday gatherings to weeknight treats.
So go ahead, grab your ingredients, and whip up this fun, colorful, and absolutely delicious no-bake dessert today!
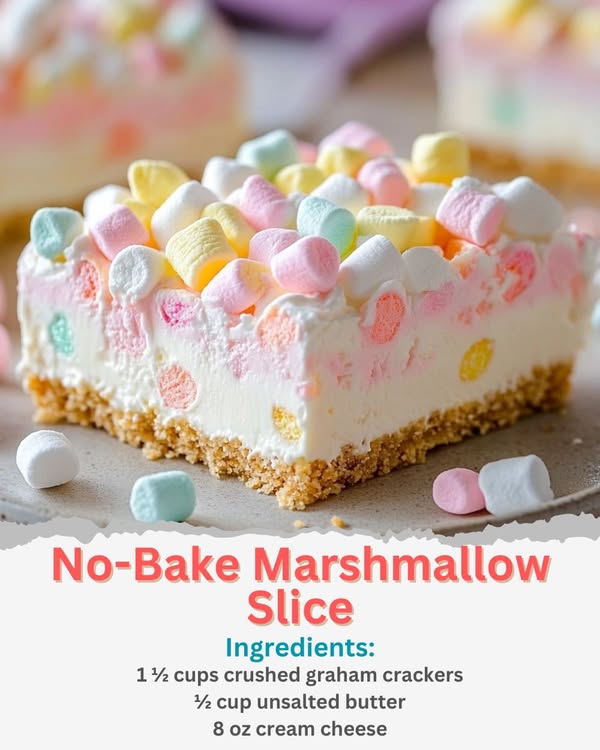
Ingredients
For the Crust:
-
- 1 ½ cups crushed graham crackers or digestive biscuits, vanilla wafers, or shortbread cookies!
- ½ cup unsalted butter melted
For the Marshmallow Filling:
-
- 8 oz cream cheese softened
- ½ cup powdered sugar
- 1 teaspoon vanilla extrac
- 1 ½ cups heavy whipping cream
- 2 cups mini rainbow marshmallows
- ½ cup white chocolate chips optional, but adds extra sweetness!
Instructions
Step 1: Prepare the Crust
-
-
In a medium bowl, mix together crushed graham crackers and melted butter until fully combined
-
-
Press the mixture firmly into the bottom of a lined 8×8-inch baking dish.
-
Chill in the refrigerator for 10 minutes while you prepare the filling.
Step 2: Make the Filling
-
-
In a large mixing bowl, beat the softened cream cheese, powdered sugar, and vanilla extract until smooth and creamy.
-
In a separate bowl, whip the heavy cream until stiff peaks form
-
Gently fold the whipped cream into the cream cheese mixture until fully incorporated.
-
Step 3: Assemble the Slice
-
-
Fold in mini marshmallows and white chocolate chips (if using).
-
Spread the marshmallow mixture evenly over the chilled crust, smoothing out the top with a spatula.
-
Sprinkle extra mini marshmallows on top for decoration
-
Step 4: Chill & Serve
-
Cover and refrigerate for at least 4 hours (or overnight) until firm.
-
Slice into 12 squares and serve chilled. Enjoy!
Notes
-
- Toast the Marshmallows for a Gooey Twist – Use a kitchen torch or broil the top for 30 seconds for a slightly toasted marshmallow flavor!
- Make It Gluten-Free – Use gluten-free graham crackers or digestive biscuits
- Try a Different Crust – Swap graham crackers for Oreo crumbs or shortbread cookies for a new flavor.
- Add Nuts or Coconut – Mix in toasted coconut, chopped nuts, or sprinkles for more texture.
- Use Different Flavored Marshmallows – Try chocolate or strawberry marshmallows for a fun twist!
