
Instructions
Step 1: Prepare the Bread
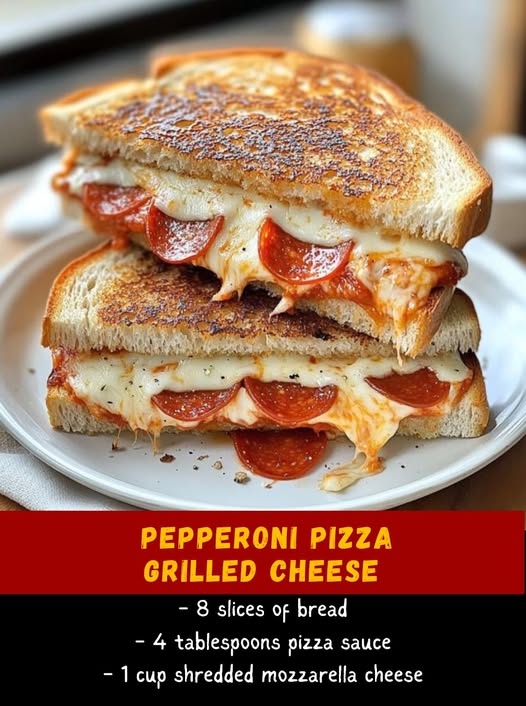
Lay out the 8 slices of bread on a clean surface. Spread about 1/2 tablespoon of pizza sauce evenly on one side of each slice. Ensure the sauce reaches the edges for full flavor in every bite.
Step 2: Assemble the Sandwiches
On four slices of bread (sauce side up):
- Add the Cheese: Sprinkle approximately 1/4 cup of shredded mozzarella cheese on each slice.
- Layer the Pepperoni: Place 6 slices of pepperoni over the cheese. Feel free to add more if you’re a pepperoni lover.
- Optional Toppings: If using, add a few fresh basil leaves, a sprinkle of Parmesan cheese, or a dash of garlic powder and red pepper flakes.
Step 3: Complete the Sandwiches
Top each assembled slice with the remaining bread slices, placing them sauce side down to create a sandwich. Gently press down to help the ingredients stick together.
Step 4: Heat the Skillet
Place a large non-stick skillet or griddle over medium heat. Add 2 tablespoons of butter to the skillet. Swirl it around until it’s fully melted and coats the bottom of the pan.
Step 5: Cook the Sandwiches
- Begin Grilling: Carefully place the sandwiches onto the hot skillet.
- Monitor Cooking: Cook for about 3-4 minutes on the first side. You’ll know it’s ready to flip when the bottom is golden brown and crispy.
- Flip Carefully: Use a wide spatula to gently flip each sandwich.
- Continue Cooking: Cook the other side for another 3-4 minutes until it’s also golden brown and the cheese is fully melted.
- Adjust Heat if Necessary: If the bread is browning too quickly, reduce the heat to prevent burning before the cheese melts.
Step 6: Serve Immediately
Once cooked to perfection, remove the sandwiches from the skillet. Let them rest for a minute or two before slicing to allow the cheese to set slightly, which makes for neater slices.
Nutrition Facts
Here’s the nutritional breakdown per sandwich to help you keep track:
-
- Servings: 4
- Calories per Serving: 400
- Protein: 20g
- Carbohydrates: 35g
- Fat: 20g
- Sodium: 800mg
Preparation Time
- Total Time: 20 minutes
- Prep Time: 10 minutes
- Cook Time: 10 minutes
How to Serve
Make your meal even more delightful with these serving ideas:
- Cutting Styles:
- Diagonal Halves: The classic way, perfect for dipping.
- Quarters: Great for smaller hands or appetizer portions.
- Strips: Ideal for dunking into sauces.
- Dipping Sauces:
- Extra Pizza Sauce: Warmed for enhanced flavor.
- Marinara Sauce: For a traditional Italian touch.
- Garlic Aioli: Adds a creamy, garlicky element.
- Side Dishes:
- Fresh Salad: A simple green salad balances the richness.
- Tomato Soup: Classic pairing with grilled cheese.
- Veggie Sticks: Carrots, celery, or cucumber for crunch.
- Beverages:
- Soft Drinks: Like cola or root beer for a nostalgic feel.
- Iced Tea or Lemonade: Refreshing options.
- Wine Pairings: A light red like Pinot Noir complements the flavors.
- Garnishes:
- Fresh Herbs: Sprinkle chopped parsley or basil on top.
- Grated Parmesan: Adds a salty kick.
- Drizzle of Olive Oil: For a Mediterranean flair.
Additional Tips
Enhance your cooking experience with these helpful suggestions:
- Butter the Bread: Instead of melting butter in the skillet, spread softened butter directly on the outer sides of the bread. This ensures even browning and prevents sticking.
- Use a Pan Lid: Covering the pan while cooking helps the cheese melt thoroughly before the bread gets too brown.
- Experiment with Cheeses: Mix in other cheeses like provolone, cheddar, or gouda for a unique flavor profile.
- Season the Sauce: If using store-bought pizza sauce, jazz it up with extra Italian seasoning or garlic powder.
- Avoid Overstuffing: While tempting, overfilling can make flipping the sandwiches tricky and messy.
Recipe Variations
Switch things up with these exciting alternatives:
Mediterranean Style
- Ingredients:
- Swap pepperoni with sliced black olives, feta cheese, and sun-dried tomatoes.
- Instructions:
- Assemble as usual, but consider using a ciabatta or focaccia bread for added authenticity.
BBQ Chicken
- Ingredients:
- Replace pizza sauce with barbecue sauce.
- Use shredded cooked chicken and smoked gouda cheese.
- Instructions:
- Mix the chicken with barbecue sauce before adding to the sandwich.
Breakfast Version
-
- Ingredients:
- Add scrambled eggs and cooked bacon.
- Use a blend of mozzarella and cheddar cheeses.
- Instructions:
- Assemble and cook as per the original recipe, perfect for a hearty breakfast.
Vegan Option
- Ingredients:
- Use vegan cheese and plant-based pepperoni.
- Substitute butter with vegan margarine.
- Instructions:
- Follow the same steps, ensuring all products are vegan-certified.
Pesto and Tomato
-
- Ingredients:
- Spread basil pesto instead of pizza sauce.
- Add sliced fresh tomatoes and mozzarella.
- Instructions:
- Be cautious of the moisture from tomatoes; pat them dry before adding.
Serving Suggestions
These ideas can help you tailor the meal to any occasion:
- Family Dinner: Serve with a side of roasted vegetables or a hearty soup.
- Game Day Snack: Cut into smaller pieces for easy sharing during sports events.
- Lunchbox Favorite: Wrap in parchment paper; it tastes great even at room temperature.
- Picnic Delight: Pack with some fruit and a beverage for an outdoor meal.
- Holiday Brunch: Add to your brunch spread alongside quiches and fresh fruit.
Freezing and Storage
Extend the life of your sandwiches with these storage tips:
Refrigeration
- How to Store: Place cooled sandwiches in an airtight container or wrap tightly with plastic wrap.
- Shelf Life: Best if consumed within 2-3 days.
- Reheating:
- Oven: Preheat to 350°F (175°C), heat sandwiches on a baking sheet for 10 minutes.
- Skillet: Reheat over medium heat for 3-4 minutes per side.
- Toaster Oven: Convenient for single servings.
Freezing
- Preparation: Assemble the sandwiches but do not cook them.
- Wrapping: Wrap each uncooked sandwich tightly in plastic wrap, then foil.
- Shelf Life: Store in the freezer for up to 1 month.
- Cooking from Frozen:
- Skillet Method: Cook over low heat for 5-6 minutes per side, covering with a lid to help the cheese melt.
- Oven Method: Bake at 375°F (190°C) for 15-20 minutes until golden and heated through.
Special Equipment
Equip your kitchen with these tools for an easier cooking process:
- Non-Stick Skillet or Griddle: Essential for even cooking and easy cleanup.
- Panini Press or Sandwich Maker: For perfectly pressed and toasted sandwiches.
- Wide Spatula: Helps flip the sandwiches without losing fillings.
- Cheese Grater: Freshly grated cheese melts better.
- Bread Knife: For slicing bread without squishing it.
- Silicone Brush: For spreading butter or sauce evenly.
Frequently Asked Questions
Q1: Can I make this recipe gluten-free?
A: Definitely! Simply substitute regular bread with your favorite gluten-free bread. Ensure that the pizza sauce and pepperoni are also gluten-free, as some brands may contain gluten.
Q2: What’s the best way to prevent the sandwich from becoming soggy?
A: Here are some tips:
- Light Toasting: Lightly toast the bread before assembling.
- Sauce Control: Don’t overdo the pizza sauce; a thin layer is sufficient.
- Dry Ingredients: Pat dry any moist ingredients like tomatoes or vegetables before adding them.
Q3: Can I use a different type of cheese?
A: Yes! While mozzarella is traditional for pizza flavor, you can experiment with:
- Cheddar: For a sharper taste.
- Provolone: Adds a mild, creamy flavor.
- Monterey Jack: Melts well and has a subtle flavor.
Mixing cheeses can also create a unique taste.
Q4: Is there a way to make this lower in calories?
A: To reduce calories:
- Use Whole Grain or Thin-Sliced Bread: Fewer calories and added fiber.
- Choose Turkey Pepperoni: Lower in fat than regular pepperoni.
- Opt for Part-Skim Mozzarella: Reduces fat content.
- Light Butter or Cooking Spray: Use less butter or a non-stick spray to cut down on fat.
Q5: How can I add more vegetables to this recipe?
A: Incorporating veggies is a great idea! You can:
- Add Spinach Leaves: Layer them over the cheese.
- Include Roasted Peppers: Adds sweetness and color.
- Use Thinly Sliced Onions or Mushrooms: Sauté them first to remove excess moisture.
Final Thoughts
Creating new traditions in the kitchen is always rewarding, and this Pepperoni Pizza Grilled Cheese has become a cherished addition to our family’s menu. It’s simple enough for a weekday lunch yet satisfying enough for a weekend treat. The flexibility of the recipe allows everyone to customize their sandwich, making it a fun and interactive meal option.
So why not give it a try? Gather your ingredients, invite the family to help assemble, and enjoy the delightful fusion of pizza and grilled cheese. It’s a guaranteed hit that’s sure to earn you smiles and maybe even a round of applause at the dinner table. Happy cooking!
